前言

AMD Alveo V80 是一块面向高性能计算和数据中心加速的 FPGA 加速卡。由于其硬件特性及软件栈的要求,在正式进行上层应用开发之前,需要对其底层运行环境、依赖库以及固件进行一系列配置。

本文主要记录 AMD Alveo V80 开发环境部署的准备阶段。内容涵盖硬件平台的安装注意事项、操作系统及内核版本的环境要求、相关测试软件与驱动的准备,以及 AVED(Alveo Versal Example Design)基础运行环境的安装与核心板的首次 JTAG 固件烧录。本文旨在为后续的模板工程构建与实际开发打下基础,并为具有类似环境搭建需求的开发者提供参考。

平台准备

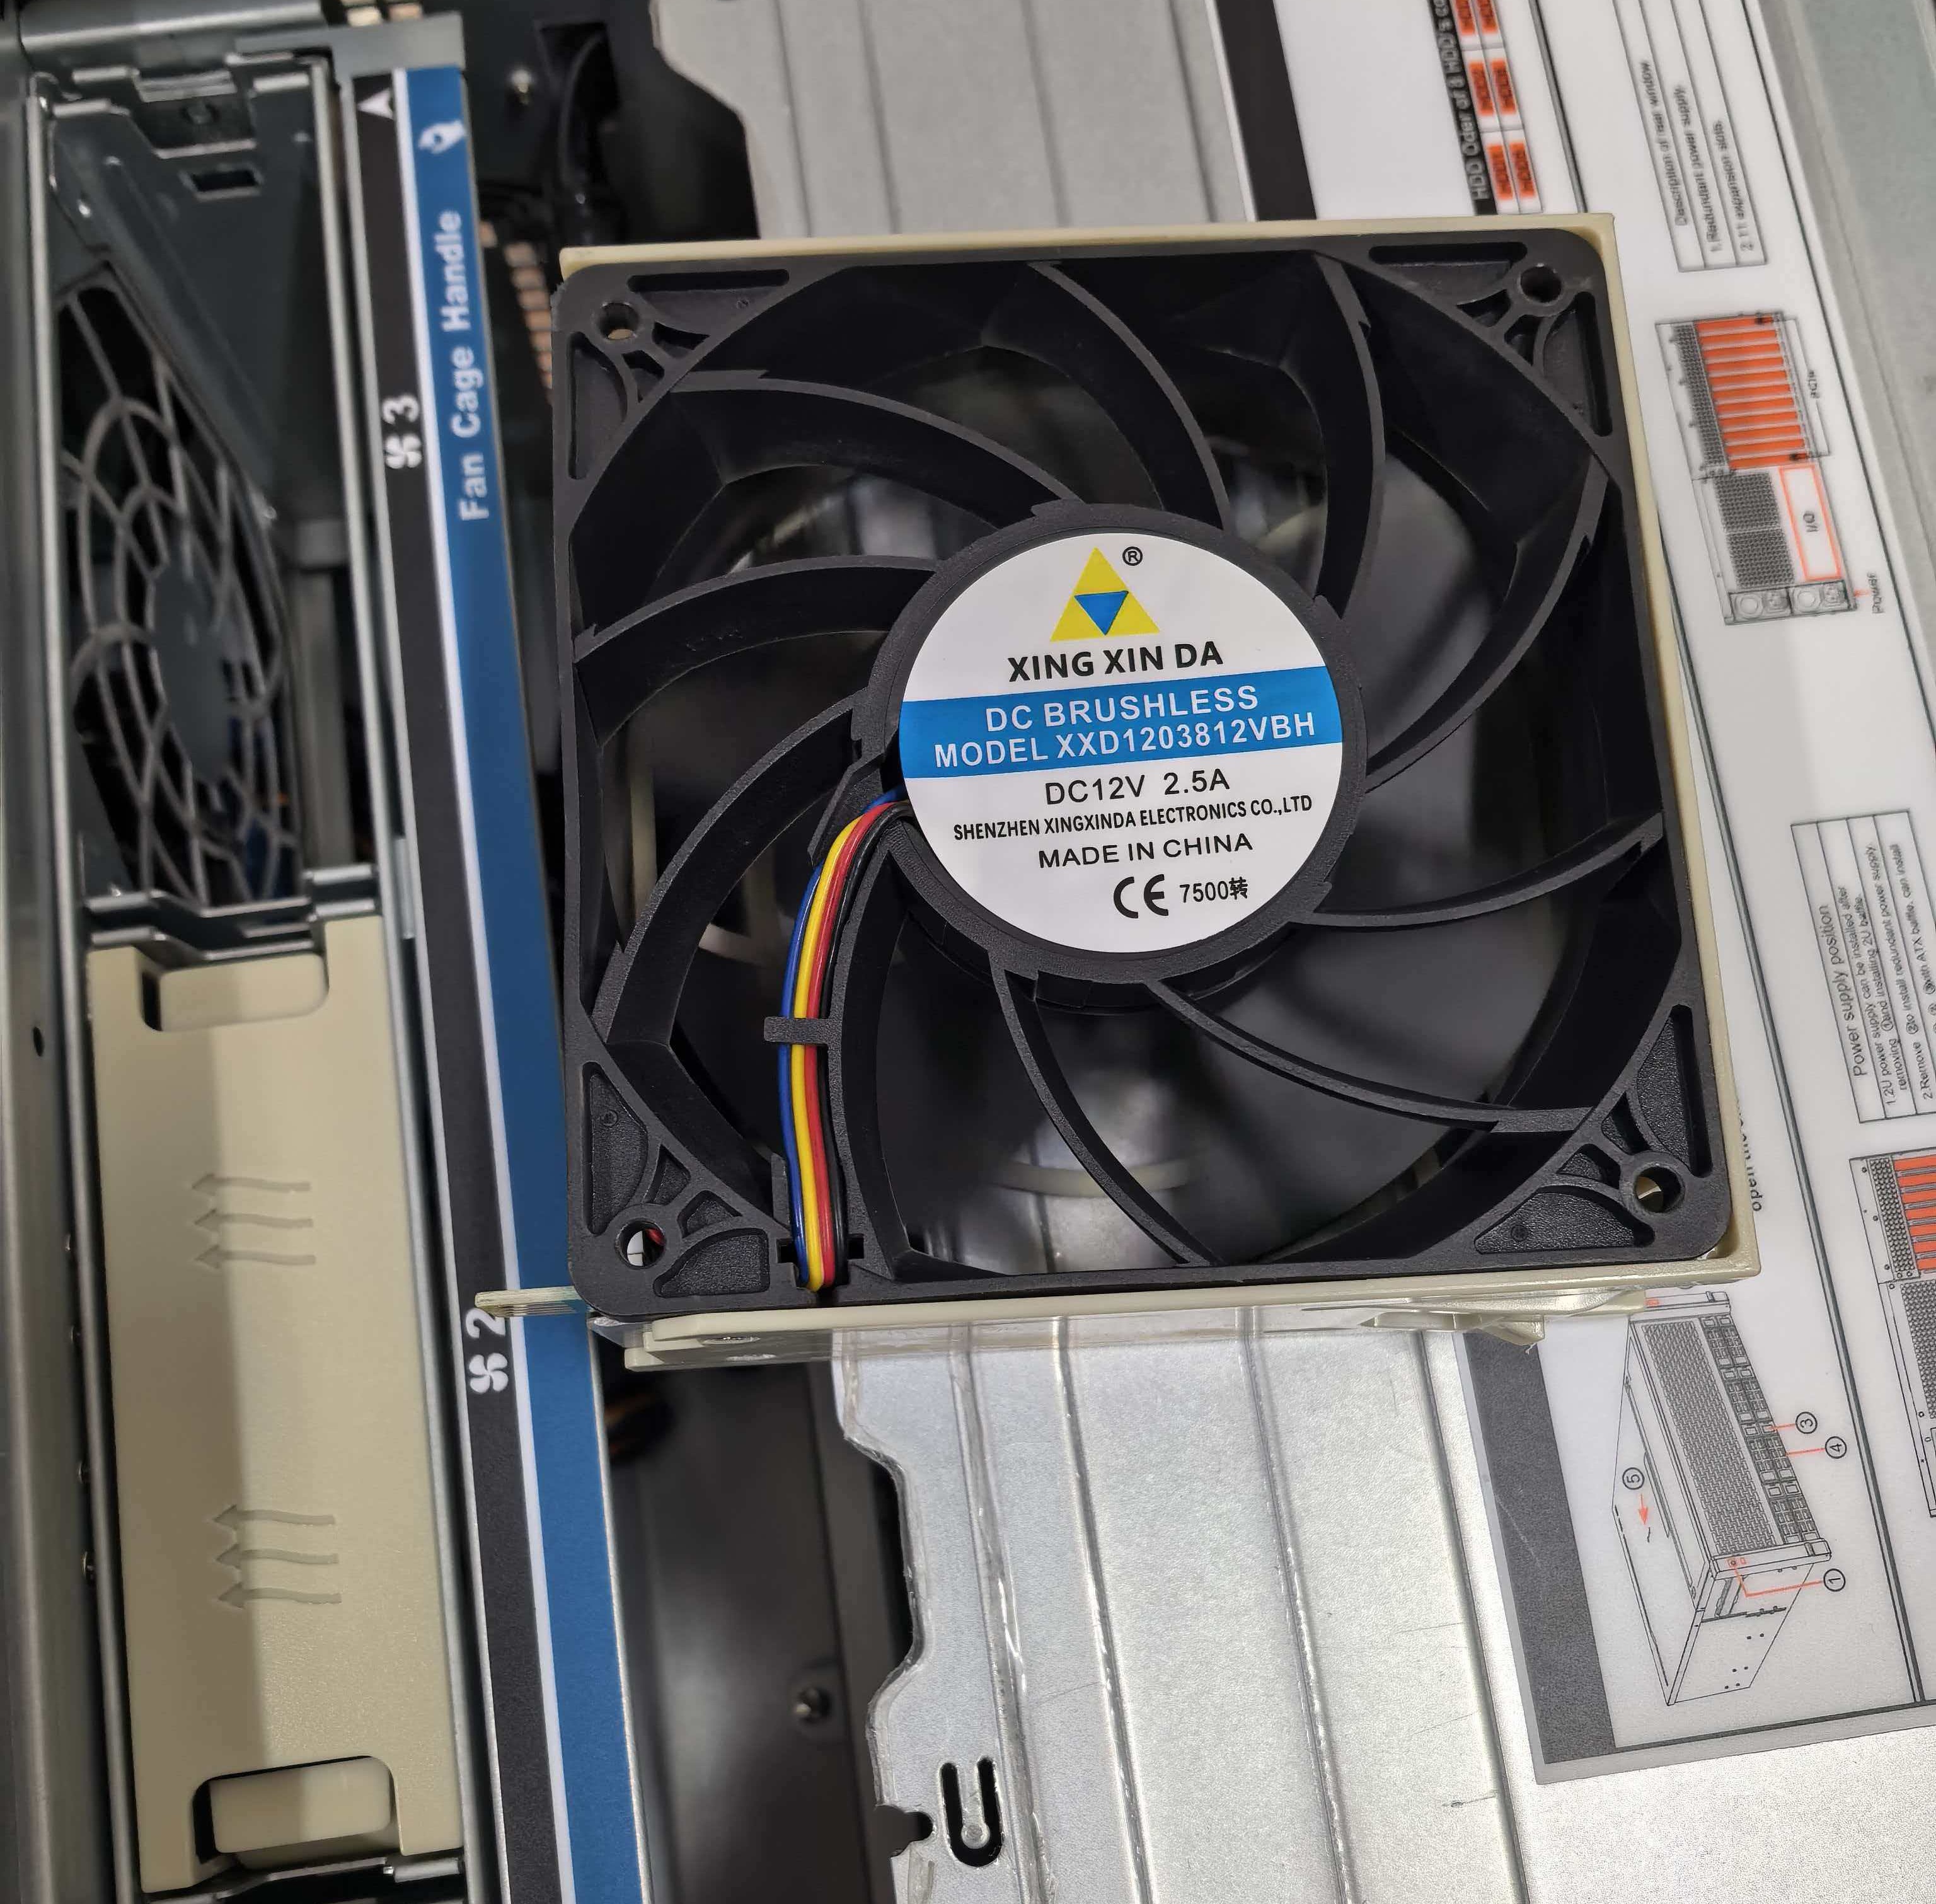
本次 V80 的安装平台为装有双路 Epyc 7513 的 4U 机架式服务器,内含 3 个最高 7000 RPM 的散热风扇。服务器给到了 128 GB 的 ECC DDR4 内存,使用 2 TB 的固态硬盘作为系统盘。Versal Adaptive SoCs 以及 QDMA 的开发手册中均提示需要至少 64 GB 的内存支持,虽然在 V80 的安装和测试环节中,我们的服务器最大内存占用没有超过 32 GB。

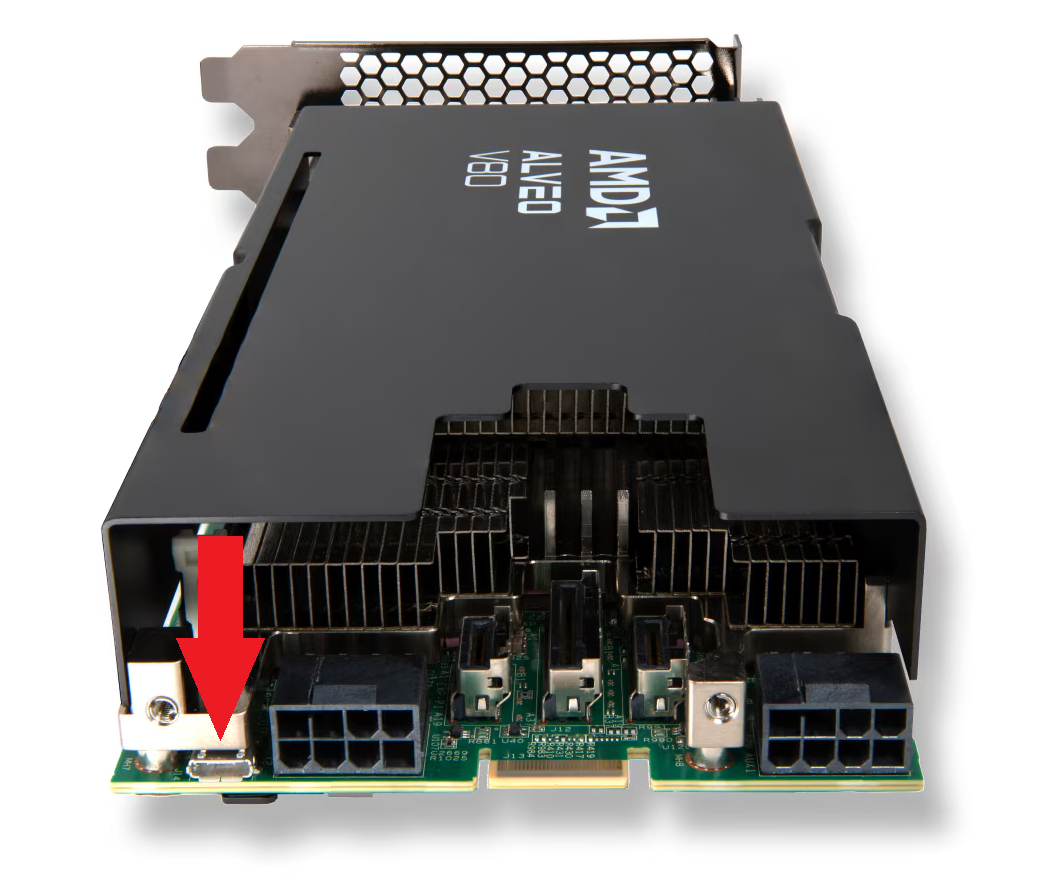
V80 板卡安装在直连 CPU 的 PCIe 4.0 x16 插槽上。V80 作为标准双槽卡,使用(75W)PCIe 插槽 +(150W * 2)双 PCIe 辅助供电线的供电方式,板卡不支持 12VHPWR —— PCIE 5.0电源线。同时板卡使用 Micro USB 作为 Jtag 连接线,我们需要通过这根线在 V80 第一次初始化时使用 Vivado 烧录 PDI(可编程定义文件,对应旧系列中的 bit 文件),而后续开发我们可以通过 Xilinx 提供的 AMC 固件和 AMI 驱动进行在线 PDI 烧录和板卡热重启。请提前准备你需要的线材

fan-in-server

重要
请务必使用机架式服务器作为你的测试平台,除非你对你的台式机的散热能力有十足的信心。Alveo V80 作为最大功耗高达 225W(TDP 190W)的被动式散热的 FPGA 板卡,十分依赖高转速大风力的散热风扇!官方手册中建议第一次安装时,要将服务器的风扇转速设置为最高,以保证板卡安全。

软件准备

系统安装前软件准备

使用 U 盘提前烧录好 Ubuntu 24.04 的系统安装镜像(我们会在后续在系统中进一步针对性安装对应版本的内核,因此 U 盘烧录的镜像可以放宽要求)。

同时我们可以提前在其他电脑下载好 AMD Unified Installer for FPGAs & Adaptive SoCs 2025.1 SFD 安装包文件,因为安装包实在是太大了(109.66 GB),安装包内包括了我们后续需要的 25.1 版本的 Vivado 和 Vitis。可通过移动硬盘或者局域网 SFTP 待系统安装完成后进行传输。

提示
从 Vivado 25.1 版本开始,在选择器件时,可以更细致的选择独立的板卡,而不是必须选择完整的一个系列,因此可以相对减少安装后的空间。

如果你希望在其他版本的系统上使用 V80,可以参考如下的表格。

Vivado 版本 操作系统 架构 支持版本 内核版本
Vivado™ 2025.1 Ubuntu x86_64 24.04 6.8.0
Vivado™ 2024.1 Ubuntu x86_64 22.04 5.15.0
5.4.0
Vivado™ 2023.2 Ubuntu x86_64 22.04 5.15.0
5.4.0
Vivado™ 2025.1 RHEL x86_64 9.4 5.14.0
Vivado™ 2024.1 RHEL x86_64 8.3 4.18.0
Vivado™ 2023.2 RHEL x86_64 8.3 4.18.0

系统安装后软件准备

切换内核版本前

在切换内核版本之前,我们可以先安装 Vivado 和 Vitis。使用 AMD Unified Installer for FPGAs & Adaptive SoCs 安装软件后,请自行安装 Jtag 驱动,同时导入对应的许可证。

同时我们可以先将需要的仓库和驱动先下载下来,包括(针对 25.1 版本):

我们需要在切换内核版本后,才能开始构建 AVED 模板工程以及 QDMA 驱动。

注意
SMBus IP 需要额外的许可证,你需要自行联系你的供货商,通过他们的账号才能获取到 SMBus IP 的下载权限和许可证,或是也可以通过自己的账户尝试申请。

切换内核版本

  1. 通过如下指令查看当前已安装的内核列表:
1
2
3
4
# 查看所有已安装的内核版本
dpkg --list | grep -i linux-image
# 查看当前正在运行的内核版本
uname -r
  1. 安装特定版本的 6.8.0-xx-generic 内核

经测试,我在内核版本为 6.8.0-100、94、83、36 的 Ubuntu 24.04 中,都可以正确编译和安装 V80 及 QDMA 的运行环境。

1
2
3
4
5
sudo apt update
# 安装特定内核
sudo apt install linux-image-6.8.0-100-generic linux-headers-6.8.0-100-generic linux-modules-6.8.0-100-generic linux-modules-extra-6.8.0-100-generic
# 锁定内核,防止升级
sudo apt-mark hold linux-image-6.8.0-100-generic linux-headers-6.8.0-100-generic linux-modules-6.8.0-100-generic linux-modules-extra-6.8.0-100-generic
  1. 重启服务器,手动切换进入到 6.8.0-100-generic 内核版本

说明
在 update-grub 后,建议完全关机再开机,热重启可能会导致服务器识别不到系统盘。相关设置可能在不同服务器的 BIOS 中有差异,请根据你的服务器的具体情况进行设置。

1
2
3
4
# 更新 GRUB
sudo update-grub
# 完全关机
sudo poweroff
  1. 进入到 6.8.0-100-generic 内核版本,清理其他内核
1
2
3
4
5
6
# 请将如下指令中的内核版本号替换成你的 1. 中显示的内核版本号
sudo apt purge linux-image-6.14.* linux-headers-6.14.* linux-modules-6.14.*
# 清理无用的依赖
sudo apt autoremove --purge
# 更新 GRUB
sudo update-grub

至此,我们应该完成了系统安装、软件准备以及内核版本的切换。

配置流程

参考
接下来的配置流程,完全可以参考官方教程内的如下两节进行:

其中,烧录 V80 的初始化镜像的这一过程必须使用 jtag 线。

如下是解压 amd_v80_gen5x8_25.1_xbtest_stress 后的文件夹内部,我们主要会用到其中的 design.pdiaved_install.sh 以及两个 .pdi 文件。

1
2
3
4
5
6
7
8
9
10
11
$THE_PATH_WHERE_YOUR_XBTEST_LOCAT/amd_v80_gen5x8_25.1_xbtest_stress_20251113
├── aved_install.sh
├── design.pdi
├── flash_setup
│   ├── fpt_setup_amd_v80_gen5x8_25.1_exdes_1_20251113.pdi
│   ├── v80_initialization.pdi
│   └── versal_change_boot_mode.tcl
├── static.xsa
├── ...
└── xbtest
└── ...

安装 AVED

请确保在安装 AVED 前卸载 Xilinx 运行时库(XRT)。

1
2
3
# 先卸载之前安装过的 XRT
apt list | grep xrt
sudo apt remove xrt

说明
由于 AVED 软件包涉及 apt 安装,而在高版本 Ubuntu 中,因此我们最好将解压后的文件夹复制到临时文件夹 /tmp 下在进行安装。

1
2
cp -r $THE_PATH_WHERE_YOUR_XBTEST_LOCAT/amd_v80_gen5x8_25.1_xbtest_stress_20251113 /tmp/
cd /tmp/amd_v80_gen5x8_25.1_xbtest_stress_20251113

如果你之前安装过 AVED 软件包,那么在使用如下指令时,会自动卸载删除旧的 AVED 软件包,而后再重新安装。

1
sudo ./aved_install.sh

如果出现了类似如下的提示内容,则说明 AVED 软件包安装成功了。

1
2
3
4
5
6
7
8
9
10
11
12
13
14
15
16
17
18
19
20
21
22
23
24
25
26
27
28
29
30
31
32
33
34
35
36
37
38
39
40
41
42
43
44
45
46
47
48
49
50
51
52
53
54
55
56
57
58
59
60
61
62
63
64
65
66
67
68
69
70
71
72
73
74
75
76
77
78
79
80
81
82
83
84
85
86
87
88
89
90
91
92
93
94
95
96
97
98
99
100
101
102
103
104
105
106
107
108
109
110
111
112
113
114
115
116
117
118
119
120
121
122
123
124
125
126
127
128
129
130
131
132
133
134
135
136
137
138
139
140
141
 
==========================================================================
Removing previous AVED installations
==========================================================================


WARNING: apt does not have a stable CLI interface. Use with caution in scripts.


==========================================================================
Removing previous installation of XBTEST
==========================================================================

Reading package lists... Done
Building dependency tree... Done
Reading state information... Done
The following packages will be REMOVED:
xbtest
0 upgraded, 0 newly installed, 1 to remove and 65 not upgraded.
After this operation, 0 B of additional disk space will be used.
(Reading database ... 193848 files and directories currently installed.)
Removing xbtest (7.1-4064028) ...
dpkg: warning: while removing xbtest, directory '/opt/amd' not empty so not removed

WARNING: apt does not have a stable CLI interface. Use with caution in scripts.


==========================================================================
Removing previous installation of AMI
==========================================================================

Reading package lists... Done
Building dependency tree... Done
Reading state information... Done
The following packages will be REMOVED:
ami
0 upgraded, 0 newly installed, 1 to remove and 65 not upgraded.
After this operation, 0 B of additional disk space will be used.
(Reading database ... 193839 files and directories currently installed.)
Removing ami (2.4.0-0.898e7542.20251120) ...
Unloading old ami driver
Unregistering ami Linux kernel module sources 2.4.0 from dkms
Module ami-2.4.0 for kernel 6.8.0-100-generic (x86_64).
Before uninstall, this module version was ACTIVE on this kernel.

ami.ko.zst:
- Uninstallation
- Deleting from: /lib/modules/6.8.0-100-generic/updates/dkms/
- Original module
- No original module was found for this module on this kernel.
- Use the dkms install command to reinstall any previous module version.
depmod...
Deleting module ami-2.4.0 completely from the DKMS tree.
dpkg: warning: while removing ami, directory '/usr/local/lib' not empty so not removed
dpkg: warning: while removing ami, directory '/usr/local/bin' not empty so not removed

==========================================================================
Removing previous installation of AVED HW
==========================================================================


==========================================================================
Installing New AVED deployment
==========================================================================


==========================================================================
AVED Deployment files copied to /opt/amd/aved/amd_v80_gen5x8_25.1_exdes_1_xbtest_stress
==========================================================================


==========================================================================
Installing AMI & XBTEST
==========================================================================

Reading package lists... Done
Building dependency tree... Done
Reading state information... Done
Note, selecting 'ami' instead of './sw_packages/ami_2.4.0-0.898e7542.20251120_amd64_24.04.deb'
Note, selecting 'xbtest' instead of './sw_packages/xbtest_7.1-4064028_amd64_24.04.deb'
The following NEW packages will be installed:
ami xbtest
0 upgraded, 2 newly installed, 0 to remove and 65 not upgraded.
Need to get 0 B/1,737 kB of archives.
After this operation, 0 B of additional disk space will be used.
Get:1 /tmp/amd_v80_gen5x8_25.1_xbtest_stress_20251113/sw_packages/ami_2.4.0-0.898e7542.20251120_amd64_24.04.deb ami amd64 2.4.0-0.898e7542.20251120 [160 kB]
Get:2 /tmp/amd_v80_gen5x8_25.1_xbtest_stress_20251113/sw_packages/xbtest_7.1-4064028_amd64_24.04.deb xbtest amd64 7.1-4064028 [1,577 kB]
Selecting previously unselected package ami.
(Reading database ... 193766 files and directories currently installed.)
Preparing to unpack .../ami_2.4.0-0.898e7542.20251120_amd64_24.04.deb ...
Unpacking ami (2.4.0-0.898e7542.20251120) ...
Selecting previously unselected package xbtest.
Preparing to unpack .../xbtest_7.1-4064028_amd64_24.04.deb ...
-e
Installing xbtest package

Unpacking xbtest (7.1-4064028) ...
Setting up xbtest (7.1-4064028) ...
-e
xbtest package installed successfully

To run xbtest:

1) Setup environment:
* If using csh, refresh your environment by running rehash. Otherwise, refer to the manual
for your shell or start a new session.

2) Run verify test on card with BDF <bdf>:
xbtest -d <BDF> -c verify

3) For more info, try:
xbtest -h
Setting up ami (2.4.0-0.898e7542.20251120) ...
Module ami not loaded. Skipping 'rmmod'.
Creating symlink /var/lib/dkms/ami/2.4.0/source -> /usr/src/ami-2.4.0
Sign command: /usr/bin/kmodsign
Signing key: /var/lib/shim-signed/mok/MOK.priv
Public certificate (MOK): /var/lib/shim-signed/mok/MOK.der

Building module:
Cleaning build area...
cd driver; make; cd ........
Signing module /var/lib/dkms/ami/2.4.0/build/driver/ami.ko
Cleaning build area...

ami.ko.zst:
Running module version sanity check.
- Original module
- No original module exists within this kernel
- Installation
- Installing to /lib/modules/6.8.0-100-generic/updates/dkms/
depmod...
INFO: Loading new ami Linux kernel modules
Done! If you are not running in bash you may need to refresh your environment before using AMI in the curr
ent shell.
If using csh, run 'rehash'. Otherwise, refer to the manual for your shell or start a new session.

==========================================================================
AVED Installation Complete
==========================================================================

烧录 V80 初始镜像

警告
这一步需要提前安装 jtag 线。在安装 jtag 线前,请务必在服务器关机断电的情况下进行。如果操作不当,可能会因静电等问题,对 jtag 接口或是 fpga 板卡内部芯片造成不可逆问题。

下图是 V80 板卡上的 jtag 接口,使用 micro usb 线连接到服务器的 USB 接口上。

micro-usb-on-v80

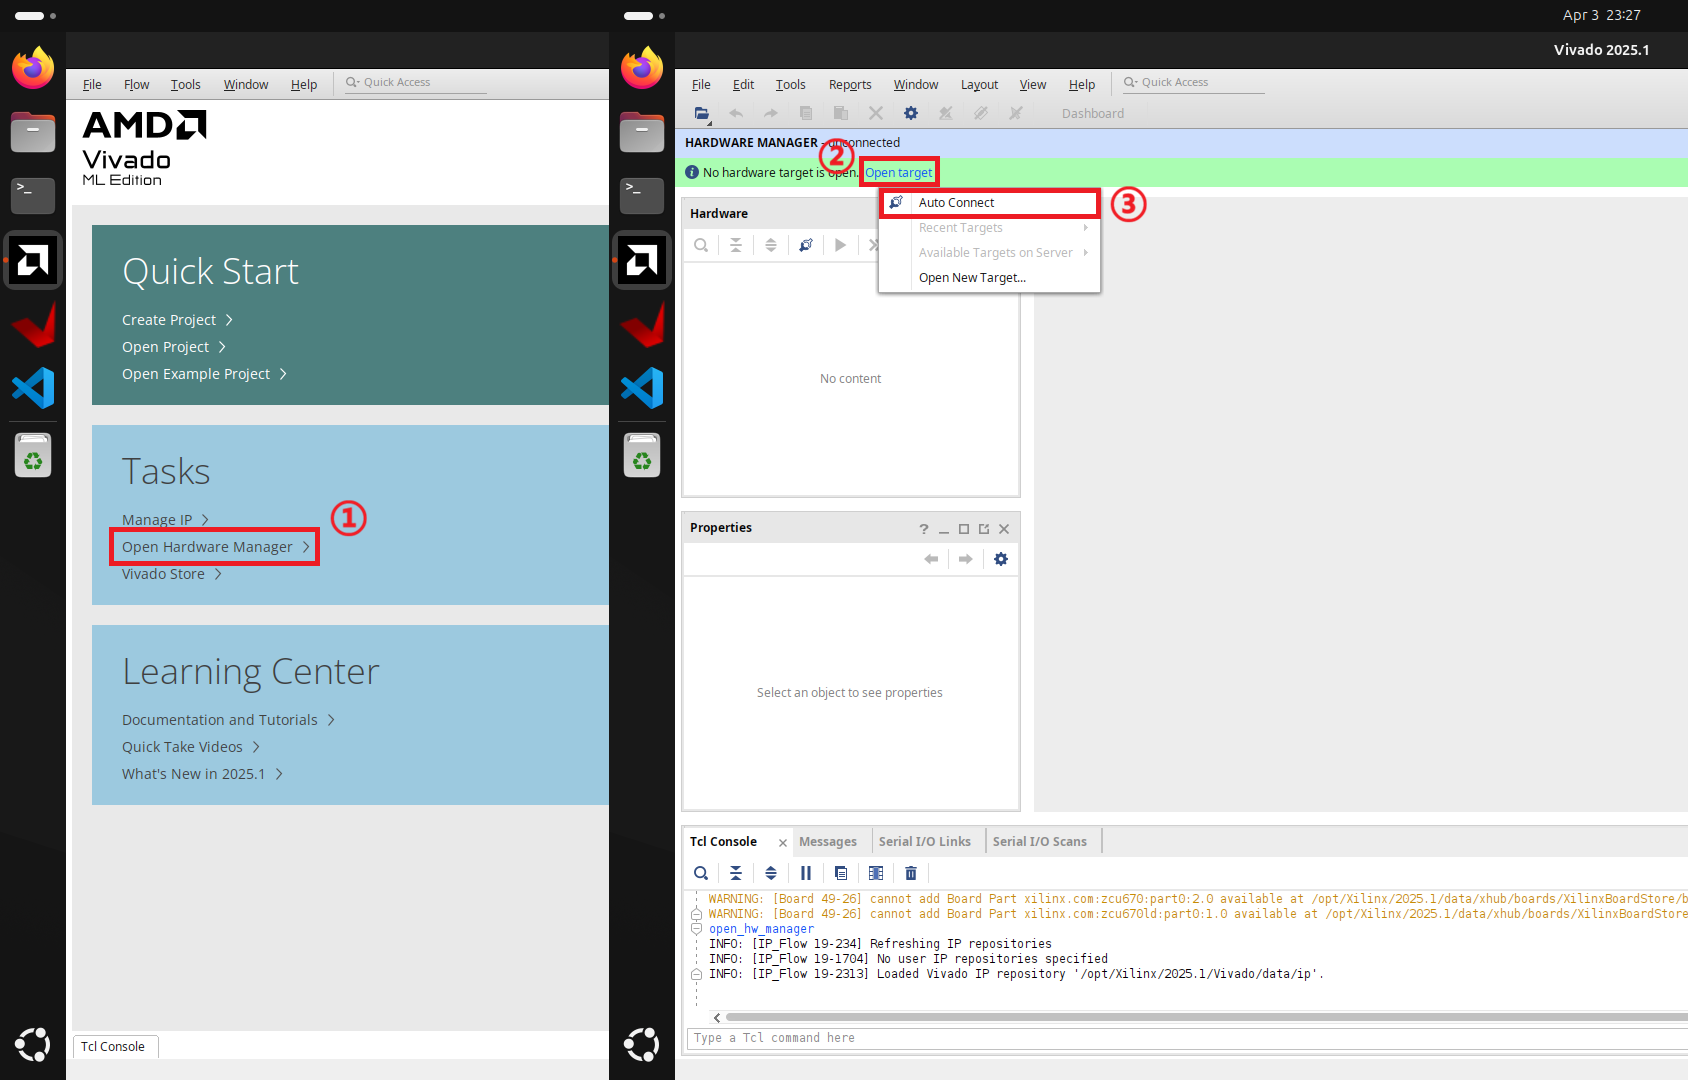
打开 Vivado 25.1,进入到 Hardware Manager,选择 Auto Connect 进行自动连接。

open-hardware-manager&auto-connect

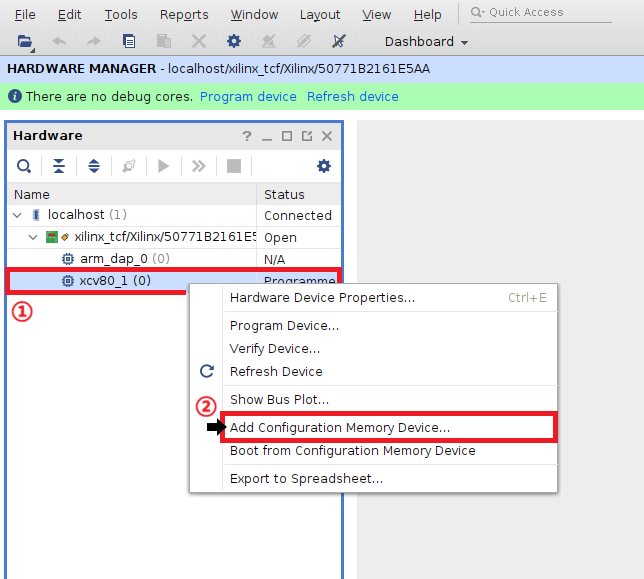
右键 xcv80 芯片,选择 Add Configuration Memory Device。

open-hardware-manager&auto-connect

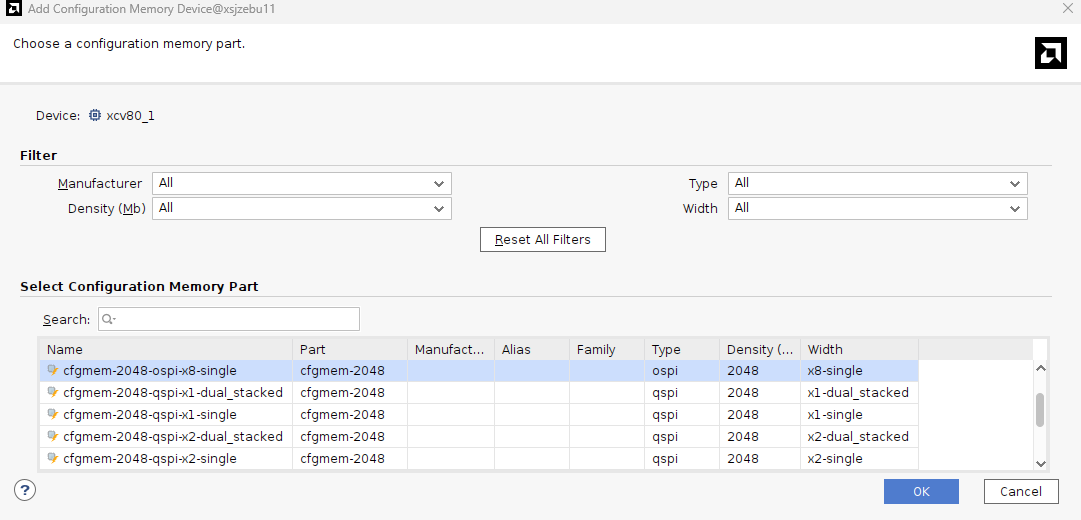
找到并选中 cfgmem-2048-ospi-x8-single,可以直接搜索 2048 来快速定位,然后点击 OK。

choose-config-mem-part

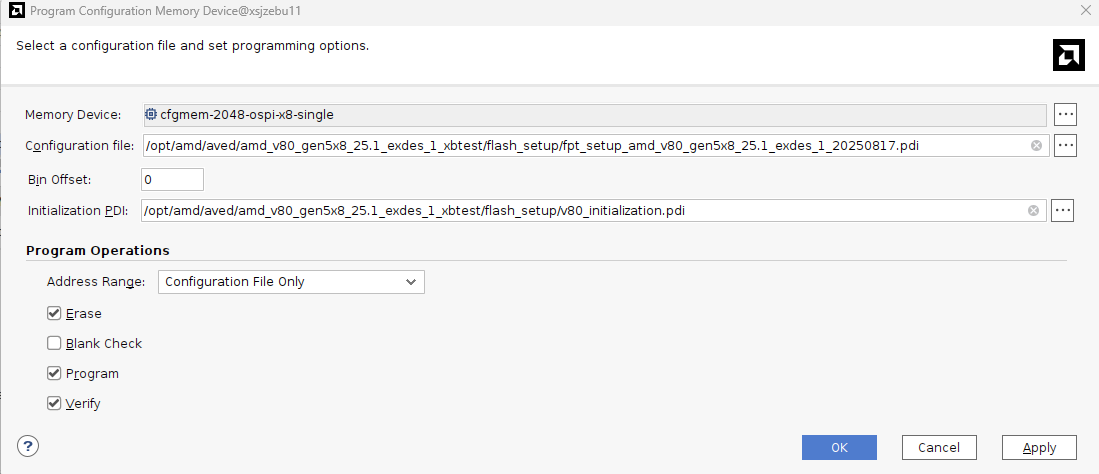
选择用于初始化烧录的两个 pdi 文件,这两个 pdi 是通过安装 AVED 软件包后,在 /opt/amd/aved/amd_v80_gen5x8_25.1_exdes_1_xbtest_xx/flash_setup 文件夹下的 fpt_setup_amd_v80_gen5x8_25.1_exdes_1_xx.pdiv80_initialization.pdi。选择好后点击 OK 开始烧录。

choose-config-mem-part

提示
烧录过程大约需要 10 分钟,请耐心等待。烧录完成后,请完全关机。

重启服务器,进入到系统后,我们可以通过 ami_tool overview 指令来查看当前 V80 的状态,确认烧录成功。

1
ami_tool overview

如果出现了类似如下的输出内容,则说明 V80 的烧录成功了!

1
2
3
4
5
6
7
8
9
10
11
12
AMI
-------------------------------------------------------------
Version | 2.4.0 (0)
Branch
Hash | 898e7542b3ce3dd7f8cef299c152b809541fd039
Hash Date | 20250918
Driver Version | 2.4.0 (0)


BDF | Device | UUID | AMC | State
-----------------------------------------------------------------------------------------
25:00.0 | ALVEO V80 INT | 709c2688cb801825929d52552b83354b | 2.4.0 (0) | READY

结语

至此,我们完成了 V80 的系统安装、软件准备、内核切换以及 AVED 的安装。后续我们将使用 xbtest 进行测试,而后进入到 AVED 模板工程的构建和测试环节。